Welcome to our user guide for creating and booking interviews using the Event Manager. This guide will walk you through the steps and provide helpful tips along the way.
The Online Event Manager feature allows candidates to book themselves in for interviews and assessment centres online.
Once the interview days and times are determined, candidates are sent an email that invites them to log in (via a link in the email) where they can view and select the days/times available on a first-come, first-served basis.
Any organisation that has a lot of recruitment activity, or who manages mass recruitment campaigns (e.g. graduate campaigns, open days etc) will find this feature hugely time-saving and cuts out a mass of frustrating administration time.
This guide includes information on:
- How to create an Event
- Inviting candidates to book an appointment
- Cancelling Candidate Interviews
- Auto-archiving
- Security Roles
How to create an Event
To access the Event Manager, select the calendar icon on the top menu:

|  |
| |

- A new window will open for you to complete the first page of information.
Details

Event creator: This will automatically populate with the name of the user creating the event after the details page has been completed.
Event name: The title of your event e.g. HR Manager - job ref 112 - 1st Interview.
Event type: Select from the dropdown which type of appointment it is (this is bespoke per client)
Which status should prompt the invite email?: The status that will trigger the email inviting candidates to log in and book their appointment.
Candidate status after booking: Detail here which status the candidate should automatically be updated to after they have booked their appointment.
This will automatically populate with the Interview Accepted status configured in System Customisation. It can be amended if required.
Candidate self-service:
| This should be toggled on: |  | for candidates to book themselves on to an appointment. |
| If it is marked as: |  | then candidates will not be able to book themselves in. |
A scenario where this may be relevant is when a client uses the calendar to collate a list of available appointments but does not want candidates to log in and book themselves in.
No. of candidates per appointment: Please detail here how many candidates can book in to each appointment.
Booking cut off restriction: Specify the number of days before the appointment candidates can book in. This includes weekends.
This does count the day of the interview as one of the days. For example, if the interview is on a Monday and you set this to 2 days, candidates would be able to book in until midnight on the Saturday.Link the event to all jobs at this location: If a location is selected, all jobs that are based at this location will be linked to this event.
Please note this feature only works for none self-service events.Assign to a campaign: Select from the dropdown to choose a campaign (bespoke per client).
Is the event private?: If this is toggled on, other users who have access to the calendar will not be able to see this calendar entry. Only the user who created it and anyone granted access in the users tab can see it. This may be useful when recruiting for a confidential role.
- Press Save & Continue to progress to the Jobs tab where you can link jobs to this event.
Jobs

- Press Save to progress to the Date/Time tab.
Date/Time
Select Add Appointment. A new window will then open.

Interview Location: Begin typing the name of your chosen location or scroll through the list of available locations.
When the candidate is booking their interview, they will be able to see the full address of the interview location including the postcode.

Please note, if no location is chosen the system will assume this is a virtual interview and will display this information to candidates when booking.
Interview Instructions: This section can be pulled into email communications to your candidates. What this section is used for is entirely up to you. For instance, use this section to add the full address of the interview location or include some instructions for candidates. We would always advise checking your Self Service Calendar email templates for accuracy.
Interviewer Details: Enter the interviewer details. This section can also be pulled through into email communications to your candidates.
Start Date: Add the start date of interview/assessment.
Start Time: Add the time the interview/assessment begins.
Appointment Duration: Add in the duration of the interview/assessment.
End Date: The date the interview/assessment ends (this will be the same as the start date).
End Time: The time interview/assessment ends.
- When all details are completed, press Save to progress to the next section.
If you’re interviewing back-to-back, simply enter the start time of your first interview and the end time of your last interview, e.g. start at 9am and finish at 1pm with a 1 hour duration this would create 4 available slots.

If you’re holding interviews all day but want a break for lunch, create two calendar entries - one for the morning slots and one for the afternoon slots. Just select Copy Appointment and change the time.

You can add multiple appointments to one calendar entry.
Emails

Emails for candidates:
Which invite email should be sent?: Select the email to send to the candidate(s) asking them to log in and book their interview/assessment slot.
Appointment cancellation email?: Select the email to send to the candidate(s) if they cancel their interview/assessment.
Appointment confirmation email?: Select the email to send to the candidate(s) after they have chosen a date and time confirming their interview/assessment.
Did you know? Use a merge field to pull in the full address of the Interview Location within your confirmation email to candidates. We would recommend adding this onto a separate line in the email template, so it displays in a professional format

Merge field to be used: {CalendarEntryAppointments.InterviewLocation}
Note: The {CalendarEntryAppointments.Instructions} and {CalendarEntryAppointments.Interviewer} merge fields cannot be used within an invite to interview email. At this stage, the candidate hasn't booked a date/ time slot, so the system cannot determine which data to send.Emails for interviewers:
Appointment email for interviewer(s): Select the email to send to the interviewer to advise them that a candidate has booked an interview/assessment. This email will include a VCS file attachment for the interviewer to easily add it into their Outlook calendar.
Appointment cancellation email for interviewer(s): Select the email to send to the interviewer if a candidate cancels their interview/assessment.
These fields can be pre-set within System Customisation (covered later in the guide). Doing so speeds up the process of creating a calendar entry and is consistent.- Press Save & Continue to progress to the Interviewers section.
Interviewers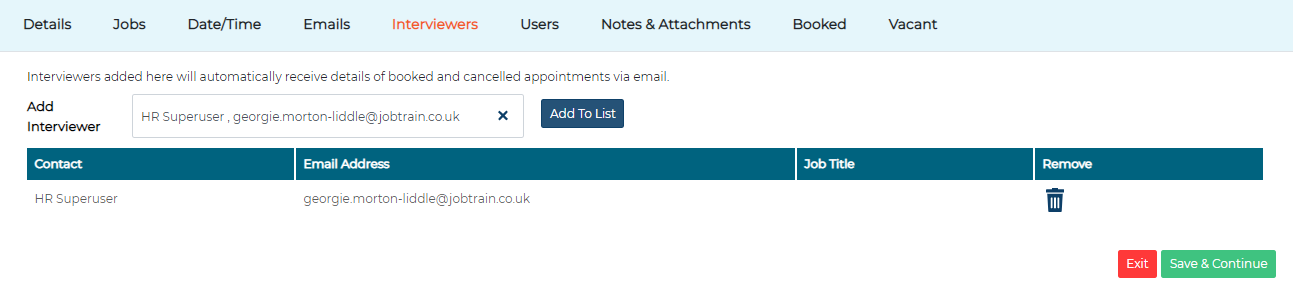
Use the dropdown box Add Interviewer to add users who should receive the emails that go to the interviewer.
This pulls from the list of users within the address book.
- Press Save & Continue to the Users section.
Users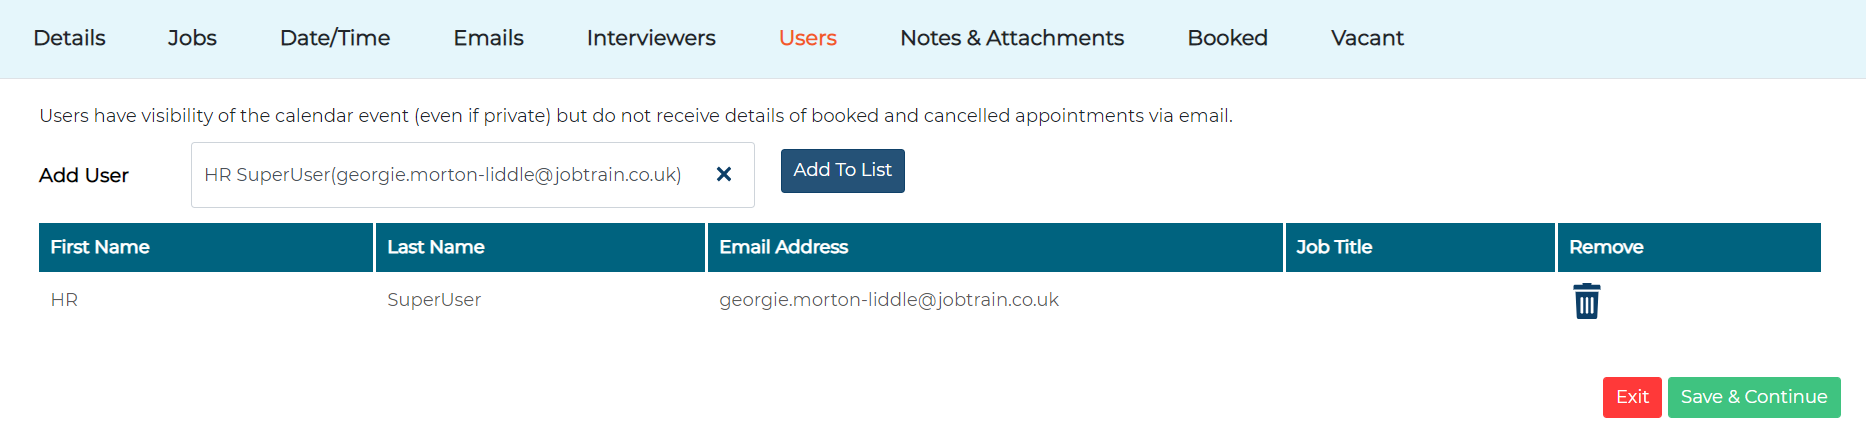
Use the dropdown box Add Users who should have access to this calendar entry.
This pulls from the list of users within System Users.'Users' have visibility of the calendar entry (even if it's private) but they will not receive details of booked and cancelled appointments via email.
- Press Save & Continue to progress to the Notes and Attachments section.
Notes and Attachments

Any notes or documents added here are available to candidates who are invited to interview when they log into their candidate profile to choose an interview appointment.
Any attachments uploaded here will automatically be included in the confirmation email to the candidate.
Did you know? The wording added in the appointment notes section can also be pulled through into the candidate email communications. Simply add in the merge field below when building your candidate confirmation email template within communications.

Merge field to be used: {CalendarEntries.Notes}
Once you have uploaded or attached a document from the document library, select Add To List to ensure this is attached to the event for candidates to view.- Press Save & Continue to progress to the Booked section.
Booked
The Booked section displays the names of candidates who have booked into the calendar entry, along with the date and time of their appointment. From this page, you can also communicate with your booked candidates via email or SMS.

- Press Continue to progress to the Vacant tab.
Vacant
Displayed in this section is a list of available interview slots for candidates to book in to.

Inviting candidates to book an appointment
After your new calendar entry has been created, the next step is to invite candidates to book a convenient interview slot.
To do this, go to the job(s) you linked the calendar entry to.
| Select the candidate(s) to invite to book interview slots. |
| Change their status to the status set out in the calendar entry when asked: "Which status should prompt the invite email?". |
| After pressing ‘Save’, this will trigger the email invite to send to the candidate(s) asking them to log in and book their slot. This email will be displayed in the candidate(s) sent emails. |


Booking on behalf of a candidate
Appointments can also be booked on behalf of candidates should the need arise.
Please note: The system defaults to restricting users from booking events beyond the booking cut off restriction which is specified in the calendar event details page.

However, you can enable the option for users to book on beyond the booking cut off restriction per security role if required.
- Go into the job(s) that the calendar entry is linked to
- Select the calendar icon next to the candidate's name that you wish to book on behalf of
- Choose List Available Appointments

You are then presented with a list of available slots. Choose a convenient appointment and select Next.

A full breakdown of available dates and times is displayed. Select the date/time you wish to book your candidate onto.

Then select Confirm Appointment.

You have now booked a slot on behalf of the candidate - they will receive a confirmation email (that was selected in the calendar entry). If you have assigned interviewers to the calendar entry, they will also receive a confirmation email.
Cancelling Candidate Interviews
To cancel on behalf of a candidate, from the candidate record or from the list of candidate’s page select the Calendar icon as shown below:
Make sure you are selecting the Calendar Icon to cancel calendar event interviews, rather than the date and time of the interview.

Then select Cancel appointment:

Followed by Cancel Appointment:

The candidate will then receive the relevant cancellation email which has been selected in the calendar entry.
Auto-archiving
The default auto-archiving event period is set to 10 weeks following the end date of the most recent appointment.

Once the event is archived, it will no longer appear in the main list of events. However, you can still use the search function to view archived events. If necessary, you can also unarchive events.

Archived events will not display a figure in the booked column, however, if you open the event and go to the ‘Booked’ tab, you will find a list of all previous appointments at the time the event was archived.


You can also view a full list of previous appointments from the candidate's record by selecting 'Previous Appointments' in the 'More' menu.
The ‘Previous Appointments’ page will display the following:
- Any unarchived or active appointments scheduled using the Calendar Event Manager.
- Any archived appointments scheduled through the Calendar Event Manager will display the term 'Archived' next to the 'Appointment Title.'
- Any manually scheduled interview appointments.

System Customisation
Some fields within the calendar setup will auto-populate based on what has been defined within your System Customisation.
You can view and amend these by following the below steps:
| In the top menu in Jobtrain select the Settings icon. | |
| Then System Customisation. |


A new window will open. Select the final tab called Calendar.

To make any changes, you can do so by using the search as you type boxes provided and then Save.
To check the default status ‘Candidate Status after booking’ go to Settings > System Customisation > Customise > and scroll down to Interview Statuses > Interview Accepted.Security Roles
Booking cut off restriction
The system defaults to restricting users from booking events beyond the booking cut off restriction which is specified in the Calendar Event details page.
If you wish to allow system users to book candidates onto Calendar Events even if the booking cut off restriction date has passed, then this can be done on a per security role basis.
Go to:
- Settings
- Security Roles
- Click to open the relevant Security Role
- Navigate to the Calendar tab
- Next to Calendar Entries – Ignore booking cut off restriction enable the following options:
- Access
- Add
- Update
- Press Save

Private Calendar Entries
If you wish for users to be able to create private calendar events, simply enable Is Private within Settings > Security Roles > Calendar.
FAQs
Can I have more than one event per job?
Yes, this is entirely possible however they must be managed by a different candidate status.
Can I have multiple jobs attached to one event?
Yes, you would simply add all required jobs on the 'Jobs' tab when creating the calendar entry.
Can I have one event with multiple dates/times?
Yes, you can build all your availability in one calendar entry.
How do I add a break for lunch?
Create your start date/time as normal and put your end date/time as the time you would like to break for lunch. Then copy this entry and amend the start time to after your lunch break.
Can I delete date/ time appointments?
Yes, you can delete appointments if there are no candidates booked on.
If there are candidates booked on you will be unable to delete the appointment until you have cancelled the existing booked slots.

Please click here for steps on how to cancel candidate appointments
What happens if I archive an event?
If you archive your entry, the dates and times recorded against the candidates who have already booked will be removed. The booked page within the event will also be wiped of all dates and times. To reinstate the dates and times, simply un-archive the entry, making it visible again in the interview report.
Archived events information is no longer reportable on in the Advanced Insights (Business Intelligence) module regardless of whether you reinstated the event. Therefore, we would only advise archiving events after the data is no longer required.If a candidate’s application is withdrawn will their appointment automatically be cancelled?
Yes, the appointment will be cancelled, and an automated cancellation email will be sent to the Interviewers listed in the Interviewers tab of the calendar event.
This email will be sent when a candidate withdraws their application and when a system user withdraws on their behalf. Further information on this is included in our withdrawn applications - email notifications user guide.
If a candidate deletes their profile, will their appointment automatically be cancelled?
Yes, the appointment will be cancelled, and an automated cancellation email will be sent to the Interviewers listed in the Interviewers tab of the calendar event.
Was this article helpful?
That’s Great!
Thank you for your feedback
Sorry! We couldn't be helpful
Thank you for your feedback
Feedback sent
We appreciate your effort and will try to fix the article