What is Onboarding in Jobtrain?
Onboarding within Jobtrain refers to the process of progressing an offer of employment to a candidate. Depending on the role/sector, there may be multiple pre-employment checks required before a formal offer of employment can be extended to a candidate.
There are a collection of tools within our Onboarding functionality to support your offer and pre-employment check processes:
Onboarding
Releases offer documentation (including Contracts) to the candidate. The candidate can view their online offer pack and return information by completing an online form, uploading a document, or confirming acceptance of their contract or any policies that may have been issued.
Compliance
Starts any pre-employment checks or tasks which may be required. Either the candidate or internal system users (e.g. HR, Hiring Managers) can be issued with forms to complete or requests to upload evidence.
Referencing
Sends a request for reference information to the candidate's referees. Referees are presented with an online reference form to complete, which is returned directly into Jobtrain.
Each of the above processes can be started in combination or individually as required by your recruitment process.

For example, if compliance checks are required before a formal offer of employment can be issued, you can choose to start the Compliance & Referencing processes and then later issue access to Onboarding & Welcome Hub.
Welcome Hub
Provides an online welcome hub where candidates can find out more information about commencing employment.
Here's what's included in this guide:
- What is Onboarding in Jobtrain?
- Completing the New Starter Form
- Starting the onboarding process
- Onboarding process - set-up page
- Referee experience
- Candidate experience
- Viewing information in the candidate’s record
- The Onboarding Hub
- Reviewing and marking information as complete
- System Alerts – reference reminder
- Gaps & Concerns
- Overall Onboarding and Compliance Setup
- Setup: Security Roles
- Setting up contracts
- Onboarding Set-Up
- Compliance Setup
- FAQs
Completing the New Starter Form
On the List of Candidates dashboard, check the box next to the candidate you would like to start onboarding for.
Click the New Starter Form button on the left-hand menu under Make Offer.
|  |
You will see that some of the information pulls through from either the job details or the candidate's record.

Complete the remaining information and press Save.
Starting the onboarding process
| Tick the box next to the candidate you would like to start the process for and select Start Onboarding Process from the left-hand menu. |  |
Onboarding process - set-up page
You will see a section for each of the onboarding areas – switch the toggle on against your chosen areas (remember, you can begin other aspects of the process as required later).

Whilst compliance, references and onboarding can all be started independently, the Welcome Hub cannot be started without at least the Onboarding or compliance process being triggered first.Start Compliance section
Complete the Compliance section following the steps below:
- Choose the compliance template required.
- Add the Compliance admin responsible for managing the candidate's compliance progress via the onboarding hub.
- Add the Hiring Manager - this allows access to view the compliance against the candidate record (non-mandatory section).

Start Onboarding section
Complete the Onboarding section following the steps below:
- Select the offer pack to send to the candidate.
- Add the Onboarding owner responsible for managing the candidate's onboarding progress via the onboarding hub.
- Add the Hiring Manager – this allows access to view the onboarding against the candidate record (non-mandatory section).

Start References section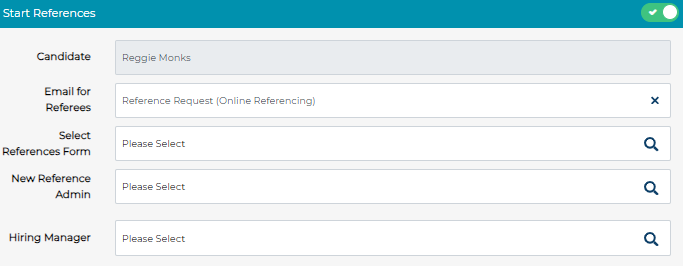
- Email for Referees: The default online reference email will automatically be added to this section to save time however it can be updated if required.
- Select the relevant Reference Form:
- If more than one type of reference form is required (depending on the referee), then select one version of the form here and trigger references for those referees.
- To trigger a different type of reference request, please use the Add new reference option on the reference tab where you can select a different reference form for the remaining referees.
- Select the Reference admin - this is the user responsible for managing the candidate's referencing progress via the onboarding hub.
- Hiring Manager: You can nominate which Hiring Manager(s) should have visibility of the reference progress for the candidate and this gives the system user access to the candidate’s data in the Onboarding Hub.
Security Role options allow configuration of the Hiring Manager’s ability to Mark Complete, Remove From Process and Change Admin in the Onboarding Hub.

If you allow access to the Onboarding Hub for Hiring Managers, they will have full visibility of all Onboarding, Compliance and References of those candidates where they are nominated as a Hiring Manager for that element of the onboarding process.
Start Welcome Hub section
Toggle this section on and from the drop down choose the Welcome Hub you would like to display to the candidate.

Statuses
- For Target Status enter the status here that the candidate should be changed to when the process is started.
- Completion Status is the status the candidate should be at once their onboarding has been completed by the administrator.
Select from the search as you type for each.

Click Save & Continue to progress to the next page and review the onboarding information for this candidate.
Onboarding process - review page
The next page shows the information contained within your chosen offer pack and compliance pack, as well as any reference information provided on the candidate's application form.
Onboarding
You can preview the content of each document/form & replace if required.
If you have included a Contract / Letter in your onboarding template, you will be presented with the option to ‘Edit Contract’.
Any changes made will not affect the template version, only the letter/contract issued at that point to that candidate.

Marking a document as Applicable/Not Applicable
Please note, the ability to add/remove items is determined by security roles.

If you do not have the correct section enabled in your security role, you will not have the ability to mark documents as ‘Applicable’ and ‘Not Applicable’.
A toggle, labelled 'Applicable' or 'Not Applicable,' allows users to selectively exclude items from the onboarding or compliance issued.
Choosing 'Not Applicable' for an item means it will not be included in the set of onboarding or compliance documents issued to the candidate.

Please note that this toggle is set to 'Applicable' by default. If there are no changes required from the template, you can proceed to select 'Save & Continue' without making any alterations.
Any changes made will only apply to the set of Onboarding / Compliance items issued to that candidate for that job. This will not affect the original onboarding template.
Candidate history and display
When a system user chooses to select ‘Not Applicable’, the date, time and user will be recorded in the candidate history.
Candidates will not have any visibility of items that have been excluded (unless a system user later decides to add this document).
Adding documents
If you marked certain items as 'Not Applicable' and excluded them, there's an additional feature that lets you add documents after onboarding / compliance documents have been issued to a candidate.

The ‘Add Documents’ button allows you to choose to release the previously excluded items from the onboarding/compliance process at a later stage.
You can select which items to release by clicking on 'Add Documents' and using the 'Applicable' or 'Not Applicable' toggle.
Here, you have the options to preview, edit, and replace documents.

Please note: You will only be given the option to add items from the original onboarding / compliance template.
If you are not presented with the ‘Add Documents’ button once the onboarding / compliance has been started, this means that all items from the original onboarding / compliance template have already been issued.If you require a new form / document / letter, you will need to either use the reset item functionality and issue a new document, or start onboarding / compliance over again, and select a template that features the item required.Once a new document has been issued to a candidate, an automated email will be sent asking them to log in and review the new document.
You can set this automated email by going to System Customisation > Emails > Add Documents Email.
If you select the option to add a new document, this will be recorded in the candidate history, along with the date and time.
Setting previously issues items as ‘Not Applicable’
If you started the onboarding process for a candidate and later found that certain documents are not required, you can reset the onboarding / compliance item.
The system will allow you to ‘reset’ the onboarding/compliance item and use the ‘Applicable/Not Applicable toggle, to mark the item as not applicable.
Please note, the ability to add/remove items is determined by Security Roles.

If you do not have the correct section enabled in your security role, you will not have the ability to mark documents as ‘Applicable’ and ‘Not Applicable’.
If an item has already been marked as complete, it is no longer possible to reset this item, as it is already classed as being returned and verified or completed.Document Integrations
If you have a document integration and you mark documents as ‘Not Applicable’ at the start or end of the onboarding/compliance process, this will not be included in the attachments sent when a candidate pack is sent across.
Compliance
Compliance works in a similar way to the onboarding section (covered earlier), however as this section can include a combination of documents for either the candidate or the Onboarding team to complete, you can see who should complete each to the right of each document.

If you have included a Contract / Letter in your compliance template, you will have the option to ‘Edit Contract’.
Any changes made will not affect the template version, only the letter/contract issued at that point to that candidate.

Marking Documents as Applicable/Not Applicable
If required, you can also selectively add/remove items from the compliance template issued using the Applicable/Not Applicable toggles (covered earlier).
The final box on the page is a reminder of the Welcome Hub template you have chosen to display to the candidate.Once you have reviewed and are happy with the content of your offer pack, press Save & Continue to start the Onboarding process for this candidate.
The candidate's status will automatically update to the status you selected in the Target Status section when starting the process and the candidate will receive the relevant email.
References
Within the references section, you will see all referees that the candidate provided on their application form.
Toggle the Send reference email to this Referee section on against all references you would like to process and then select Save & Continue.

If the 'Do you give permission to take up this reference prior to an offer of employment being made?' question is used in the application form, then the candidate's answer will be displayed here.

If this question is not included in your application, then the Yes/No answer box will be blank.
Requesting additional references
Navigate to the Onboarding / References section of the candidates record to request additional references.
Add New Reference

Once the references have been requested, there is now an Add New Reference button within the candidates record.
- This can be used to do a ‘quick add’ of basic new referee details, as well as the ability to proceed immediately to requesting a new reference.
- This can also be used to trigger different types of reference request, where you can select a different reference form for any remaining referees.

Referee experience
| When the onboarding process is started, the system automatically sends an email to each referee, including a link to log in and a system-generated password.
When referees log in, they see a welcome message. They’re then asked to either continue and complete the reference form or decline to complete the reference (which will direct them to a page to provide their reasons why).
If they choose to continue and give a reference, then the reference form chosen when starting the process will be displayed. |  |
After completion, referees are asked to electronically sign the declaration using either the stylised text or the free-hand option before submitting and logging out.
Our system can also generate automatic reference reminders (covered later in this guide).
The reference must be completed in one single session and the password is valid for a single use only.
Candidate experience
When the candidate receives the email to complete their onboarding, they are asked to log into their profile as a returning candidate.

After pressing Start Onboarding, they are presented with a welcome page - clicking the Let's get started button will display their personalised offer/compliance pack to complete (items may require candidates to agree to the contents, download and (if necessary) upload required information, or provide information on an online form).

Clicking Agree against a document allows the candidate to either type in a stylised signature or sign free-hand on the onboarding agreed page; once complete, a time/date stamp is recorded against that document, which is visible on both the client and candidate side.
| There is also a graph on the candidate’s actions page that shows the completion percentage for both the candidate and recruiter combined.
The graph increases differently depending who is responsible for the action:
|  |

As each candidate document is saved, the system will update both the candidate’s page and the Onboarding Hub in real-time, so both you and the candidate are aware of what has been added.
- When candidates upload a document or image, they can now view both the original documents and their uploaded version of the document
At the top of the page, there is a What we are working on section.

As the Compliance admin saves a document and marks it as complete within the candidate’s record, a tick will show against the relevant label. The candidate side graph will also increase to show this as complete.
If references have been started against a candidate, they will show in the What we are working on section. Once references have been received, reviewed, and marked as complete, this will be reflected in both this section and the graph.
Viewing information in the candidate’s record
To review the candidate's progress in their record, press More and select the Onboarding/References option from the menu.

Depending on which options were started, you will see up to three tabs – Onboarding, Compliance and Reference information.
Within each tab, you can reset individual items, mark the item as complete or identify a gap/concern against the document (covered later in the guide).
Reference tab – additional functionality
In addition to the above, this tab allows you to add notes against each reference sent, as well as upload a copy of any manual reference sent in place of completing the online form (covered later in the guide).

The Onboarding Hub
The Onboarding Hub is opened from the Quick Links dropdown menu (this is accessible in the top left-hand corner from anywhere in your Jobtrain platform) with several sections - each explained below.

Throughout the hub, wherever you see the candidate's name you can click through to their record to see their onboarding, reference, and compliance content in more detail.
Actions menu
We have added an Actions button across all Onboarding Hub pages. This allows you to:
- Send an email from any page of the Onboarding Hub
- Send a text message from any page of the Onboarding Hub
- Access a candidate’s Starter Form / Checklist (which is usually found against the candidate record within the job they have been offered)
- Mark the candidate’s overall Onboarding / Compliance as complete from any page of the Onboarding Hub
- Remove the candidate from the process from any page of the Onboarding Hub
- Assign New Admin updates the Onboarding / Reference / Compliance admin from the associated Onboarding Hub page *
* The Assign New Admin feature only adds additional admins to the existing admin list.

This does not change or replace the existing one.
Search Onboarding sections
- A Search Candidate Name field appears across all tabs of the Onboarding Hub. This allows you to search directly by a candidate’s name to see their progress.
- The search/filter menu now allows you to search by the following filter options:
- Onboarding/Reference/Compliance Admin/Hiring Manager dependent on which tab of the Onboarding Hub you are viewing.
- On all tabs, you can filter by:
- Candidate Application Status
- Department
- Division
- Job
- Job Location
- In the References tab, you can filter by the Referee's email address.
If you have chosen to exclude items from the onboarding template when   issuing this to a candidate, these sections will appear greyed out against the candidate within the onboarding hub.

The onboarding progress menu against the candidate record will not include any items you have chosen to mark as ‘Not Applicable’.

The % complete summary will also update to reflect the updated total number of items required.
Icons
There are a number of icons used to reflect the candidate’s progress throughout the Onboarding Hub, as below:
| Item is part of the template that has been triggered for the candidate, however it has not been completed yet |
| Item has been agreed to or uploaded, or a form has been updated and saved (as required) |
| Item has been marked as complete by the Onboarding / Compliance administrator |
| Candidate has queried the item (rather than agreeing to it) |
| A red dot in the corner of a box means that a note has been added to the section. |
| Shows a reference has been attached to the candidate (as opposed to completed using the online portal) |
| Shows a reference has been provided using the online portal |
| Item has had a gap / concern marked against it and sent to the Hiring Manager to approve / decline. |


Onboarding Hub – overview tab
This section shows a list of candidates going through the Compliance, References or Onboarding process.

Selecting a candidate's name takes you to their record within the job they applied for.
Against each candidate is a % complete bar indicating the progress against their Compliance, References or Onboarding template. When the percentage bar does not have a % displayed, it means the process hasn't been started for that candidate yet.
Below is an example that shows the candidate has had compliance and onboarding templates triggered but references have not been started for them.

The Onboarding Admin column will bring up a window with a list of the Admins and Hiring Managers assigned to that candidate by section.

Sub-statuses
Within the overview tab, you can see/update the Onboarding sub-statuses against each candidate.

- You can update candidates’ sub-statuses by clicking on the ‘Onboarding Status’ of the candidate, within the Onboarding Hub Overview tab. Once a candidate has been updated to an onboarding status that is displayed on the Onboarding Hub, their record will automatically display in the Onboarding Hub and their data will also be included in the Onboarding Stats tab.

Sub statuses are a separate list of statuses that help remind the compliance admin of the completed stages against each candidate. These differ from the standard list of statuses used to progress the candidate through the recruitment journey.
The default sub-status that each candidate is marked as when the process starts is set in System Customisation. There is also a section to define which status should be used to mark candidates Hired Under a Risk Assessment (to allow the candidate to be processed with certain disclosure areas missing).
The default sub-status the candidate is updated to will depend on how their onboarding and / or compliance has been started. Below outlines which sub-status a candidate will be updated to in different scenarios:
- Within System Customisation, if both Onboarding & Compliance sub-statuses have been populated, and Compliance OR Onboarding is started alone, then the sub-status will reflect either the Onboarding OR Compliance sub-status according to which one is started.
- Within System Customisation, if both Onboarding and Compliance sub-statuses are set and both Onboarding and Compliance are started together, the Onboarding sub-status will have precedence.
- Within System Customisation, if the Onboarding sub-status is set and Compliance sub-status is blank and only Compliance is started, the system will pick the Onboarding sub-status for Compliance.
- Within System Customisation, if the Compliance sub-status is set and Onboarding sub-status is blank and only Onboarding is started, the system will pick the Compliance sub-status for Onboarding.
'Hidden’ Onboarding Sub-Statuses
We have also added the ability to filter by Onboarding Sub-Statuses.

Select which sub-statuses are displayed in the Onboarding Hub by going to Settings > Onboarding > Onboarding Sub-Statuses.
After selecting a sub-status, you wish to be included in the Onboarding Hub, you can then choose to toggle on Display in Onboarding Hub.

If you choose not to include certain sub-statuses from the Onboarding Hub, the candidates will be hidden from the Onboarding Hub across all sections.
To find candidates at ‘hidden’ onboarding sub-statuses, we have added the ability to be able to include the hidden sub statuses.
- Include Hidden Statuses toggle allows you to search for all candidates, including those at hidden statuses.

The benefits of ‘hiding’ candidates at certain onboarding sub-statuses is it allows you to manage offers where the onboarding may pause or remain incomplete, without having to ‘mark complete’ or remove all onboarding data returned so far.- If a candidate is at a ‘hidden’ onboarding sub-status, their data is not included to the stats tiles that are displayed in the Onboarding Hub.
- All onboarding sub-status changes are tracked in the candidate’s history log.
Candidates at hidden onboarding sub-statuses will still appear in the Standard Onboarding, Referencing and Compliance reports.Onboarding, Compliance & Reference Reports
- A candidate application status filter has been added across Onboarding, Compliance and Reference reports.

When running an Onboarding / Compliance report, if any documents have been marked as ‘Not Applicable’ at the start or end of the process, they will be excluded from the report.
Remove From Process
Depending on your security role, you may also see the Remove from Process button.
This is designed to allow you to remove a candidate from the process without having to mark their onboarding progress as complete (for example, if the candidate has withdrawn from the process). |  |
Please note, this will remove candidates' onboarding / compliance / references progress from the system.
The system is designed to only allow users to remove one candidate from the process at a time to reduce the risk of accidental removal.Onboarding Hub - Stats

This tab is designed to show Team Leader / Manager stats for each of the Onboarding administrators in their team. It shows:
- The number of people the individual has managed to Compliance
- The average number of days to complete Compliance
- How long for references to be returned
- How many gaps / concerns they have flagged against the candidates they are managing
The teams are defined within Onboarding settings (covered later in this guide).
Onboarding Hub - Onboarding
The Onboarding tab shows all candidates that have had an Onboarding template started against their record.

Along the top are short headings for each template – these are determined in Onboarding settings (covered later in this guide).
Please note: The issued date will indicate the date that the onboarding template was issued to the candidate – this may differ from the issued date logged in the compliance hub if these have been issued individually.
Onboarding / Compliance pack
- If you have issued Onboarding / Compliance pack to a candidate and the pack does not include all the listed documents, this will be greyed out to allow you to have better visibility of the items that are not required for the candidate to complete.
- The Onboarding Progress menu in the candidate record will not feature any onboarding / compliance items that have been set as ‘Not Applicable’ and excluded.
NotesAny section with a red circle in the bottom corner indicates a note has been added against that item. In the Onboarding/References/Compliance tabs, if you see a red dot next to an item, this means that there is a note against it. |

- To view the note, simply click on the red dot next to the item and this will display the Candidates Notes menu.

Compliance
- Once a note is added against a compliance item, the red dot appears against that item in the Compliance tab of the Onboarding Hub.
- If there are multiple items within a compliance category, the red dot appears against the candidate’s name in the Compliance tab.
- A notes button now appears across all tabs in the Onboarding Progress menu of the candidate record:

- If a note has been added, a red dot will also display against the item in the candidate/onboarding progress display:

- By clicking on the red dot, it will open the Candidate Notes menu against that item, whilst still viewing the candidate’s onboarding progress record.
Onboarding Metrics
There are several metrics at the top of the page, explained below.

- Currently Onboarding: The number of candidates who currently have an ongoing Onboarding process against their record
- Completed Onboarding: The number of candidates that have had an onboarding process completed against them in the last 30 days
- Av. Time to Onboard: The average time to complete an onboarding process in the last 30 days
- No. with imminent start date (at risk): The number of candidates with an imminent start date. This is calculated as the candidate's start date minus the average time to onboard in the last 30 days.
Assign New Onboarding Admin

The Assign New Admin button allows you to amend the user responsible for managing that candidate through the Onboarding process.
Please note that this feature only adds additional admins to the existing admin list.
This does not change or replace the existing one.
Mark Complete
This option is how you confirm that the candidate's Onboarding, Compliance, and reference checks have all been reviewed and are final.
By clicking this, the candidate's status will update to the completion status chosen at the start of the process and they will receive an email confirming the process is complete.
Clicking the 'Mark Complete' button in the onboarding hub will remove the candidate from the hub, but it does not complete outstanding onboarding items. The Mark Complete buttons will remain in the candidate’s onboarding progress page against any pending tasks to ensure an accurate audit log.
Onboarding Hub - References
The referencing tab shows all candidates that have had references sent and the progress of each reference requested; each reference appears on an individual line, so you may see more than one entry for a candidate.

To view the content of the reference, press the eye icon in the View column. This will direct you to the candidate’s record where you can view the reference details, accept as complete, flag a gap/concern or upload a manual reference.
Reference Metrics
There are several metrics along the top of the page, explained below.

- Number of candidates currently with at least one reference being processed against their record.
- Number of candidates that have had all processed references completed in the last 30 days.
- The average time to complete references in the last 30 days.
- Total number of outstanding references
Onboarding Hub - Compliance
The compliance tab works in a similar way to the onboarding tab, however the difference here is some of the documents may need to be completed by the onboarding team rather than the candidate.
You can create a template with multiple documents against each section. Columns with multiple items/documents will have several ticks/crosses equal to the number of items, and as each one is completed (marked as complete by the user), the cross will change to a tick.
Where the section has no crosses/ticks then it means that the template used doesn't require the candidate to complete those documents, so they have not been issued.

Compliance Metrics
There are several metrics at the top of the page, explained below.
- Currently at Compliance: The number of candidates who currently have an ongoing Compliance process against their record.
- Completed Compliance: Number of candidates that have had a compliance process completed against them in the last 30 days.
- Av. Completed Compliance: The average time to complete a compliance process in the last 30 days.
- No. with imminent start date (at risk): The number of candidates with an imminent start date – this is calculated as the candidate's start date minus the average time to onboard in the last 30 days.
Assign New Compliance Admin

This allows you to amend the user responsible for managing the candidate through the Compliance process.
The Assign New Admin feature only adds additional admins to the existing admin list.
This does not change or replace the existing one.
Issued Date: The issued date will indicate the date that the compliance process was started – this may differ from the issued date logged in the compliance hub if these have been issued individually rather than at the same time.
Reviewing and marking information as complete
Onboarding
Reviewing Documents
When a candidate begins to review and process their onboarding documents, the Onboarding Hub will mark sections that have been saved by them with a 'thumbs up' icon.

You can review the document content directly from the onboarding hub or by clicking on the candidate's name to go to their record and navigate to the Onboarding / References section.
To review the document content directly from the onboarding hub, press the ‘thumbs up’ icon. You'll then see the options to preview the document.

To review document from the candidates, record, press the candidate's name to go to their record and navigate to the Onboarding / References section.

In each section there is an option to view the document – this could be titled:
- Preview Attachment (for uploaded documents)
- Preview Form (for Onboarding forms)
- Preview Contract (for contracts/offer letters)
Marking Items as Complete
If the document is completed in the correct way, then click Mark Complete to mark the document as reviewed and finalised.

The onboarding hub will then reflect this document as complete with a green tick icon.

If the square is blank, then the document was not part of the onboarding template. If there is a number, then the candidate hasn't completed the document (the number reflects how many days since onboarding was started for that candidate).Viewing Signed Candidate Documents
If you select to Preview Contract as Word Document this will download the contract as a word document to your device and will include the candidates signature and the date they agreed to the contract.
Please note: The candidate’s signature and date they agreed to the contract will only be visible when previewing the word document, providing the relevant merge fields are present in the contract.

Please click here to view further details of how to check and add in these merge fields if they are not present.
If a candidate has completed and signed an onboarding or compliance form, you can view the candidates’ signature when you select Preview Form.
When previewing the form there are additional options at the bottom of the page that allow you to Print and/or Export the form as a word document – both options will include the candidates signature.
Top tip: You can utilise Candidate Packs, accessible in the left-hand menu under Communication, to send onboarding documents via email? This email will include the candidate's captured signatures on the respective documents.Resetting Items
If there is an issue with a document, or a candidate makes a mistake and needs to re-submit their information again, you can reset an item.

Click the Reset Item button to open the reset page; here you can preview or replace the document, or simply click save to reset the item.

The candidate will then be able to complete the document as they would if it had not been started before (i.e. any data entered will be completely wiped).
Reset Item Email Notification
You can set up an email to automatically trigger when resetting an onboarding or compliance item, to inform the candidate to review and return the re-issued item.
For compliance items, this email will only be triggered where the item is assigned to the candidate to complete. If the item is assigned to a compliance admin, no email will be sent when the item is reset.
This can be configured by going to:
Settings > System Customisation > Emails > Onboarding Process > ‘Reset Email’

You must ensure that an email is selected in this section. If no email is configured, a ‘Something Went Wrong’ message will be displayed when attempting to reset the item.
Resetting Onboarding or Compliance Templates
You can reset the candidate's onboarding or compliance (for instance if they have been sent the incorrect information).
Important: Resetting the Onboarding & Compliance Templates will remove all current onboarding / compliance data, including any documents completed by candidates.

The system will replace this information with the newly selected onboarding template during the reset process.

Keep in mind that once this data is wiped, it cannot be recovered. Therefore, only choose this option if you do not need to retain any of the existing content in the system.
To do so navigate to the Onboarding / References section of the candidate record.

Then simply click the Reset Onboarding Template OR |  |
Reset Compliance Template button. |  |
You will then be directed to a page that allows to select the relevant onboarding / compliance template and restart the process.
This will trigger a new email to the candidate asking them to login and review their offer details and the candidate’s history and sent emails will update to reflect this.
Candidate History: Onboarding / Compliance not started message
You may see the below message in the candidate history after resetting onboarding or compliance.

This message displays when the candidate was already in the Target status for onboarding/compliance before you reset the onboarding/compliance process.

Therefore, indicating that the system has reset onboarding/compliance, but has not updated the candidate's status.
Please note, resetting onboarding or compliance does mean all existing onboarding & compliance information will be lost.Compliance
Where the Onboarding hub is populated with candidates’ actions, as the compliance information is completed by a combination of the candidate and the compliance admin, (in varying degrees dependent on the template used), the process for finalising the full compliance template is slightly different to that of the Onboarding tab.
Completing Compliance documentsWhen a compliance template has been started against a candidate, the icons on the Compliance tab will be displayed as crosses. |

The number of crosses indicates the number of documents that need to be completed for that section.Click on the column section to open the notes. If the section is a single document, you will see the required action buttons:

If the section has more than one document to complete, the notes menu will include a drop down.
Choose an option and the relevant actions will then be displayed - either Form (to complete an online form) or Preview and Upload (to upload a relevant document to this section and preview the document from the template).

Once a document has been completed (either by the candidate or the administrator), the icon updates to the 'thumbs up' icon and is recorded in the candidate's history.

Marking Compliance Items as Complete
To mark the document complete, click on the candidate's name to go to their record.
Find the document in the Compliance tab and click Mark Complete.

The icon will change to a green tick to reflect that the document has been reviewed and marked as final.

Compliance - NotesWhen you’re completing a compliance document, it’s always useful to include a note against the document.
For example, if there is outstanding information required against a form, or if there is information that needs to be noted against that section of the compliance checks that isn't covered in the section already.
Notes are added against the individual document on the compliance tab.
Select the option from the item drop down and the notes section will appear below.
Enter a title and note content then press save. |

Notes will then appear at the bottom of the section whenever you view that item. |  |
Referencing
Onboarding Hub View
The References section in the onboarding hub shows all ongoing reference requests, making it simple for you to monitor and track them during the process.

| When a referee has completed a reference, the Completed column will show the envelope icon and the date the online reference was completed by the referee. |  |
The reference content is stored within the candidate’s record.
To access it, click either on the candidate's name to the left-hand side… |
|
Or the eye icon to the right of the candidate row. |
|


Candidate Record
On the References Progress tab in the candidate’s record, you will see the date the reference was sent and submitted as well as the signature provided by the referee.

Reminder Reference Last Sent On: This will show the Date/Time of any System Alert Reminder emails and those sent using the Send Reminder button displayed in the above screenshot.

Use the Actions menu to access the relevant buttons to review and progress the reference:
Some of the Reference Actions are Security Role based (Cancel, Edit, Send Reminder, Upload Manual Reference, Gap/Concern, Notes), so the display will vary dependent on a user’s Security Role configuration.
Reference Form
Allows you to preview the reference form content.
Send Reminder
Send the referee a reminder of the outstanding request (this is in addition to the automated reminders via system alerts – covered later in this guide).
Gap/Concern
This allows you to send any reference that doesn't match required criteria to be approved by the Line Manager (covered later in the guide).
Mark Complete
Select here to mark this reference as having been reviewed and confirmed as correct by the Administrator.
Once the document is marked complete, the entry on the candidate’s record will show the date/time stamp and the name of the system user that marked the record as complete.
This will also prevent any further reference reminders being sent to the referee including automated reference reminders configured in system alerts.

The onboarding hub will also show this reference as complete with a green tick icon on the References tab. |  |
Notes
Here you add notes to references. Simply add a title and content, then press save.
|
|
The note will be recorded against that reference (indicated with the red dot icon on the referencing tab).
|
|


Upload Manual Reference
Sometimes, referees prefer to send a standard reference, or their policy doesn't allow online reference completion. In these instances, you can attach a manual reference to a candidate’s record and still have it logged in the Onboarding Hub reference tab.
Click the Upload Manual Reference button to add a manual reference response against each reference record.
When the upload box is on screen, browse for the document on your device, add a document name and click Upload.

Once uploaded, an additional option is displayed against the reference record – View Manually Uploaded Reference – clicking this will download a copy of the reference to be viewed.
A time and date stamp will also be added to the record to show when it was added to the record.

From the onboarding hub, the reference will show as uploaded (shown by the paperclip icon) alongside the date it was uploaded.

Once the Onboarding administrator has reviewed the reference, it should be marked complete, and the completion information (date/time completed and by whom) will populate.
The icon on the Onboarding hub will also update to the green tick.

Cancel Reference
The ability to cancel a reference and prevent future automated reminders from being sent. Additionally, the overall completion percentage on the candidate's portal will be updated to reflect the reduced total number of expected references.
Edit Referee Details
The ability to edit and update a referee’s email (and for any future automated reminders to go the updated email address).
Where a referee’s email address has been edited, the Onboarding Hub displays an orange tick:

History
Click this to view all reference history for that candidate.


All System Alert reference reminders sent will be logged here in addition to the candidate’s history and will detail the referee's name, email address and company name.
System Alerts – reference reminder
System Alerts have several uses and are designed to send overnight notifications based on the rules within the template used.
This section of the guide focuses on how they are used in the onboarding process as reference reminders. |  |
System Alerts Templates
Go to Settings then to System Alerts Setup > System Alerts Templates in the left-hand menu.
Select an existing template to amend and press Add New Alert.
A new pop-up box with open with several options along the top – select Job References.
You have the ability to send (up to a maximum) of five automated reference reminder emails.

Reminder emails cannot be sent indefinitely as there is a risk the 'from' email address will be blocked as spam if reminders continue to auto-send.

The number of email reminders that can be issued is therefore limited to five.
Add the number of days after the reference has been sent that the alert should be sent and choose an email template to be sent to the referee for this alert.
Email templates are managed within Communication Settings.
Press Save at the bottom of the alert section, and again at the bottom of the alert to complete.

Attaching alerts to jobs
Go to the Search and Alerts tab within the job. At the bottom of the page, is a heading called System Alerts.
Simply select the appropriate template from the drop-down, then click Save & Continue or Save & Close.

Gaps & Concerns
If a candidate provides onboarding information that doesn't match the expected criteria, the information needs to be reviewed and confirmed as acceptable by the Hiring Manager for the candidate to be able to start with the organisation.
This process is managed using the Gaps & Concerns process.
Sending Gaps & Concerns emails
Within the Onboarding and Compliance tabs in a candidate’s record, the Gap/Concern button is available directly against each document.
Within the References tab, the Gap/Concern option is accessed via the Actions menu for each reference. Selecting this will open the email window.

Select the system user you would like to send the email to from the “To” drop down:

The email will default to the standard gaps and concerns template email, however if this needs to be changed, you can select a different email template from the Select an email drop-down.

The email subject will automatically populate to include the candidate's name and role that they have applied for and it's possible to amend the content of the email to reflect the gap/concern reason.
Once you’re happy with the content of the email, click Send.

The ‘Document Attached’ section confirms which document will be included in the Gaps & Concerns email (for the manager to review and approve/decline).

When a reference is sent as a Gap & Concern, the system will automatically include the reference form. If a manual reference document has been uploaded, this will automatically be included within the Gaps & Concerns email.
Tracking Gaps & Concerns Responses
In the candidate’s record
| The document in the onboarding section of the candidate’s record will include a section called Gap/Concern which will show when the email was sent and to whom. |  |
Once the Hiring Manager has reviewed and agreed / declined the document, the section will update to reflect their decision.

In the Onboarding Hub
When the document is awaiting a gap / concern response, the icon on the hub will show the Gap/Concern icon.

When the document has been approved, the icon will change to the 'thumbs up' icon with a red dot to indicate there is a note attached to the record.

Select the icon to open the notes page against that document, to see the details of when the document was agreed and who agreed to it.

When a document is rejected by the manager, the icon will not change to reflect that there is a gap or concern with that document.

Open the notes page against that document to see the details of when the document was rejected and by whom.
Overall Onboarding and Compliance Setup
System Customisation - Sub-statuses
There are areas in System Customisation that need to be completed to allow some of the default functionality to work.
The sub-statuses are used on the Overview tab of the Onboarding Hub – to add the default statuses, select the Customise tab.

The Onboarding Sub-statuses section is at the bottom of the page; select the relevant statuses from each drop-down and press Save at the bottom of the page.

You will need to make sure you have selected a default onboarding and compliance sub-status.Target Status and Completion Status
This is the default status that the candidate will be updated to once the onboarding / compliance process has been started/completed but can be adjusted when onboarding your candidate.

Onboarding Blue Flag Sub-Status
Here you can define which status should be used to mark candidates Hired Under a Risk Assessment (to allow the candidate to be processed with certain disclosure areas missing).
System Customisation - default emails
There are several default emails that are assigned within the Emails tab of the system customisation section.

- Gap & Concern Email – this is the default email that is sent when a gap/concern is flagged.
- Default Email for References – this is the default email that will be sent to referees when starting references.

To complete each, select the relevant email template from the drop-down and then click Save at the bottom of the page.
System Customisation – References
Specify the minimum number of references required from candidates
You can specify the minimum number of references required from candidates during the application process for each different candidate portal.
Go to Settings > System Settings > System Customisation
Within System Customisation navigate to the Other tab and scroll down to Reference Settings.
Select from the dropdown menu the minimum number of references required from candidates for each portal and then Save.

Once you have made this change, any candidates who apply moving forwards will be required to add the minimum number of references.
Setup: Security Roles
To ensure the relevant people have access to the onboarding and compliance functionality, each security role needs to be customised.
To access the Security Roles, click on System Settings > Security Roles, and select the Security Role you want to update.
Toggle on the sections that the Security Role needs access to then click Save.
This section focuses solely on the Security Role sections that supports the Onboarding and Compliance functionality.
My Workspace
The My Workspace Tab is the first section of Security Roles. |

If users with this Security Role should have access to remove candidates from the Onboarding process (without them having completed the onboarding process, e.g., when a candidate has withdrawn from the process), then the button should be switched on using the below option.


This will give access to the Remove From Process button on the Overview tab of the Onboarding hub.

Jobs & Talent Pools
There are several sections within the Jobs & Talent Pools section that are connected to the onboarding process, as below. |


- Upload Manual References – Allows users to upload manual References against a candidate’s record.
- List Candidate - Start References – Toggle on Access, this will allow users to view reference forms.
- If you would like a user to have access to start references and edit referee details, they will need Access, Add and Update toggled on.
- List Candidate – Cancel Reference - Toggle on Access, Add and Update, this will allow users to cancel the reference
- View Gaps & Concern Emails – Allows users to view the email that was sent to the manager to request approval (including the approval links)
- Mark Complete – Provides access to the Mark Complete buttons against candidates’ Onboarding documents.
- Reset Item – Provides access to the Reset Item buttons against candidates’ Onboarding documents.
- Gap/Concern – Provides access to the Gap/Concern buttons against candidates’ Onboarding documents.
- References Notes – Allows users to view and add notes against candidates’ references.
- Starter Form Notification – switch on this option to provide access to the contract request form notification feature.
- Starter form – Provides access to the Contract Request Form
- Additional Starter Form – Provides access to the Pay Enhancements Form
- Start Compliance – Gives the user the ability to start compliance for a candidate (note - this must be switched on at the same time as the Start Onboarding toggle(s) to work).
- Start Greenroom – Gives the user the ability to trigger the Greenroom/Welcome Hub for a candidate (note - this must be switched on at the same time as the Start Onboarding toggle(s) to work).
- Add/Remove Onboarding Compliance Items – Gives users access to set items as Not Applicable and the ability to Add Documents later in the process.
Setting up contracts
Contract Sections
The first step in creating new Onboarding contracts is to create the Contract sections. They are designed to be added either as the whole contract in one section or create separate sections for each clause or section of the contract.
Click on Settings > Communication > Contract Options > Contract Sections and select New Contract Section from the left-hand menu.

Select New Contract Section from the left-hand menu.
- Add a contract section title. If adding contracts in one section, give this the same title as the contract will have. If using to add a section or clause, give this section the name of the clause/section.

- Enter the information into the text box and use the available formatting tools to edit as required.
As with any copied wording, we advise copying the content from Notepad (or equivalent programme) before pasting into Jobtrain to ensure all hidden formatting is removed.Using merge fields
- To add a merge field, use the search box next to Insert/Update Date Field to start typing the name of the field you wish to use, or you can click on the magnifying glass and this will show you a complete list of fields available.

- Once you have found your chosen merge field, place your cursor in the text box where you would like to insert the merge field and then click Insert/Update Date Field. Merge fields can only be added one at a time
- Your merge field will now be visible.
TIP: You can add merge fields to contracts to pull in today’s date, the candidate’s signature and the date they agreed to the document.

Today’s date merge field = {TodayDate}
Signature merge field = {Signature}
Agreement date = {AgreedToTermsOn}

We advise saving the changes to your contract section as you are working through. This will prevent you from losing any changes as the system will timeout after a period of inactivity.
Date Merge fields
You can customise the appearance of the date merge fields in candidate contracts and offer letters. This feature enables you to choose a long format such as "Tuesday 26th March, 2024" for a more professional contract or letter appearance.
To specify the date format go to Settings > System Customisation > Set the date format and select the preferred date format for communications.

Formatting Contracts
- To add an indent to any points of your contract section, use the
 button on the text editor menu.
 - To add a link to a website, click the paperclip icon
 in the text editor menu.
The below window will then open:

- Add Display Text: this is the wording that will be displayed in the contract. So, in the above example when a candidate selects ‘click here’ they will then be directed to the website entered.
- Link Type: select URL
- Protocol: choose what precedes the URL - https:// or http:// or one of the other options available
- URL: add the URL/link
Press OK. The link will now be added to the contract section.
Once complete press Save.
To add a link to an email address, click the paperclip icon![]() in the text editor menu.
in the text editor menu.
The below window will then open:

- Link Type: select E-mail
- E-Mail Address: add the email address here
- Message Subject: add the message subject
Press OK. The link will now be added to the contract section.
To add a table, click on the table icon ![]() and then use the details below to set up your table. Once done, select OK. Your table will now appear for you to type in or copy and paste details across.
and then use the details below to set up your table. Once done, select OK. Your table will now appear for you to type in or copy and paste details across.

Once complete, press Save.
To enter merge fields, select the relevant field from the relevant section and click Insert/ Update Data Field.
Once complete, click Save.
When you’re copying content from another source into Jobtrain, we advise copying it into Notepad (or equivalent) before pasting into Jobtrain – this will ensure all hidden formatting is removed.
Contracts
Once contract sections are complete, you can begin to create contracts.
Click Settings > Communication > Contract Options > Contracts and select Create Contract from the left-hand menu.

Add the contract name in the Subject box, then select the relevant contract sections from the search as you type drop down box and click Insert Contract Sections (Location or Department are both optional fields).
Each added section will appear underneath in the order you added them. If not in the incorrect order, simply click and drag to the correct place; if you need to remove any options, click the remove button to the right of the label.
Once you are happy with the content, click Save.

Onboarding Set-Up
To access the onboarding and compliance settings, click Settings > Onboarding Setup.

Onboarding Overall Settings
The Onboarding Settings area is where you can find a complete list of item categories available for onboarding or compliance purposes.
This includes an in depth set of onboarding or compliance categories that you can utilise.
Once you've selected a category from the list, the Onboarding Templates feature enables you to customise the specific documents, forms or content that will be linked with that onboarding category for a given type of offer.
Onboarding Settings
This section controls how the onboarding process is customised – there are two key tabs within it; Customise and Document List.
Document List
The Document(s) List tab is where you define the sections within the onboarding templates.
Each section needs a description label, which is seen by candidates when starting the onboarding process, and a short label, which is used as a tile for the Onboarding Hub columns.

Important: Once you have built a Document List it is not possible to make changes on this page.

If you need to make changes to the Document List, you will need to delete the old document item and add a new one.

From here, you will be able to drag and drop to re-order.

Amending and updating Onboarding Settings
To prevent updates to Onboarding or Compliance templates from affecting candidates / users mid-way through the process, we have made some changes to Onboarding / Compliance Settings and Templates.
- You can click and drag to re-order the display of Onboarding items. The display order change is reflected in the Onboarding Hub.
- The document list description can no longer be edited.
- You can no longer edit the document list title.
- By selecting Add New, you can create a new Description and Short Label (which displays on the Onboarding hub).
- Once you have saved the new item, the text boxes will disappear and revert to a non-editable display.
- If you need to change or re-label an existing item, click Add New and enter a new label for the item.
- Once you have done this, you will need to use the delete icon to remove any Onboarding items that are no longer required.
Please note: If there are any Onboarding templates with content against this item, users are prompted to review the specific onboarding templates that include the content against the item that is being removed (see below).

If required, you can copy and create a new version of the Onboarding templates that do not include the item that is being removed.

- Once the changes have been made to the Onboarding overall settings, this will update the display of the Onboarding Hub.
- Onboarding pages will update to reflect the changes of the labels and the order set.

Any existing onboarding templates in place prior to the changes will not be altered.
If a user attempts to 'Delete' an overall Onboarding checklist item that isn’t used in any existing onboarding templates, a warning prompt is displayed, as shown below.

Although the item will no longer be visible in the onboarding hub, you will still be able to view this from the affected candidates record.
You can copy and create new versions of Onboarding templates that do not contain the item to be removed.
Onboarding – Sub Statuses
It is essential that you set up sub-statuses otherwise this will stop you from being able to see candidates in the Onboarding Hub.
If you do not set a compliance sub status in system customisation and start compliance for a candidate, they will not automatically appear in the list. You need to toggle on 'Include hidden sub-statuses'
You can set up your sub statuses by following the below steps:
Settings > Onboarding Setup > Sub-Statuses > New Status.
You can then select if you would like the Sub-status to be displayed in the Onboarding Hub.

If you do not have sub-statuses set up, your candidates won't automatically appear in the OB Hub unless you toggle on 'Include hidden sub-statuses'.Onboarding - Document Types
This section allows you to categorise the documents you add to the Onboarding document library.
You must have at least one to categorise the documents, however you can add as many categories as you feel would be useful – e.g. Handbooks, Useful guidance, Polices, etc.
Onboarding - Document Library
Add any documents in this section that you would like to be included with the Onboarding templates as download/upload files.

Click New Document and enter a document name and a title for candidates, then pick the Document Category from the drop down. Click Choose File to browse then upload your chosen document.
Please note the 1MB upload limit per document.Onboarding Forms
Onboarding Forms allow you to build forms for candidates to complete online.
Select New Form from the left-hand menu, enter a title and any instructions and click Save.
Any instructions added will be displayed to the candidate when they are completing the online form and when previewing forms from the client side.

- If you would like to capture a signature from the candidate when they are completing the onboarding form simply toggle Is Signature Allowed on.
- Once toggled on, another option will appear entitled Is Signature Mandatory, which allows you to determine whether it should be mandatory for the candidate to sign the form.

A second tab will then be displayed – Questions. Click on this to build the form.
These forms are built in a similar way to the assessment forms functionality – you can create new questions or matrix questions, (e.g. to ask candidates their availability to work on different days of the week, or their required uniform and sizes), reorder your form and preview how it will look.
Click New Question to create a new question in one of the following formats.

- Multi-Choice (one answer) - Presents a radio button against each option, however the candidate is only able to choose one response.
- Multi-Choice (more than one answer) - Presents the options with a checkbox against each. The candidate can select as many answers as they wish.
- Order of Importance - Presents the options with an entry field against each option where the candidate can enter a numerical value to rank the selections.
- Free Text - A large, free text field
- Short Text - A smaller text field
- Section-Header - Inserts a heading.
- Instructions - Inserts text instructions
- Date - A calendar dd/mm/yyyy field, with a calendar picker for the candidate to use.
Add the question wording under Question Text, choose whether the question should be mandatory, and then click Save.
Any multiple-choice questions require the options to be added to the second Options tab. When you’re happy with the question content, click Save.

Onboarding Templates
After creating all elements of the Onboarding template, you are ready to build the templates themselves.
Go to Settings > Onboarding Setup > Onboarding Templates.
You will see a list of all existing Onboarding Templates. Each template shows its creation date and indicates if bank details are included (if this feature is enabled).

Creating New Onboarding Templates
Select New Template from the left-hand menu, add a template name and click Save.
The onboarding sections you created in the onboarding settings will appear below for you to select the relevant contract, document, or onboarding form for each section.
Each type of onboarding information is added under the relevant column – for example contracts are selected from the contract drop down column.

If the candidate needs to download/upload the document, tick the Upload box next to that document. If the candidate needs to agree to the document, leave the toggle switch off.

After everything has been added, click Save.
Onboarding templates enable you to customise the specific documents, forms or content that will be associated with that onboarding or compliance pack for a given type of offer.- Once an Onboarding template has been issued to candidate(s) it is no longer editable and the ‘Save’ button will no longer appear.
- A copy button has been added to Onboarding templates to make the process of updating new versions of Onboarding templates easier.

Within onboarding templates, you can send an email to IT if you wish.

This email is triggered when you mark onboarding as complete from the Onboarding hub.
Once the candidate has been marked as complete, the candidate's status will automatically update in two different scenarios.
1. In Settings > System Customisation > Completion Status, you can select a status so that once a candidate has been marked as complete, their status will automatically updated to the chosen status selected here:

2. If there is no status selected within System Customisation when you start onboarding for a candidate, there is a 'Status' section where you can select Completion Status. This will appear as blank.
You can add a completion status here. However, if you do not select a completion status in System Customisation or when starting onboarding, the candidate's status will not automatically update when marking them as complete:

Compliance Setup
Compliance Settings
The Compliance Settings area is where you can find a complete list of item categories available for compliance purposes & controls the basic set up of the Compliance templates.

The Document List tab is the key focus for your system setup.
Document List
The Document(s) List tab is where you define the sections within the Compliance templates.

Each section requires a description label (visible to candidates during the onboarding process) and a short label that appears on the Onboarding hub as highlighted below.

Important: Once you have built a Document List it is not possible to make changes on this page.

If you need to make changes to the Document List, you will need to delete the old document item and add a new one.

From here, you will be able to drag and drop to re-order.
Amending and updating Compliance Settings
- You can click and drag to re-order the display of Compliance items. The display order change is reflected in the Onboarding Hub.
- The document list description can no longer be edited.
- By selecting Add New, you can create a new Description and Short Label (which displays on the Onboarding hub).
- Once you have saved the new item, the text boxes will disappear and revert to a non-editable display.
- If you need to change or re-label an existing item, click Add New and enter a new label for the item.
- Once you have done this, you will need to use the delete icon to remove any compliance items that are no longer required.
If there are any Compliance templates with content against the item, users are prompted to review the specific Compliance templates that include the content against the item that you are removing (see below).

You can copy and create a new version of the Compliance templates that do not include the item that is being removed if required.

If a user attempts to 'Delete' an overall compliance item that isn’t used in any existing compliance templates, a warning prompt is displayed, as shown below:

Although the item will no longer be visible in the onboarding hub, you will still be able to view this from the affected candidate's record.
Once the changes have been made to the Compliance overall settings, this will update the display of the Onboarding Hub.
Compliance pages will update to reflect the changes of the labels and the order set.
Any existing Compliance in place prior to the changes will not be altered.Compliance Design Settings
The compliance design settings control how the Onboarding landing page and the candidate action page look for candidates.
The functionality works in a similar way to the Welcome Hub template builder – you can select colourways, upload images and logos, as well as update wording to better match your organisation’s culture and brand.
There are two tabs – one for the landing page (shown below) and another for the Actions page.

Please note, there can only be one version of each page.Landing Page
- Logo – the dimensions must be 280 x 140 pixels
- Header background (if required – this is the navigation bar area with the menu options) – the dimensions must be 1900 x 140 pixels
- Background image (if required) – the dimensions must be 1200 x 500 pixels
- Content and manager information is required for this page

Actions Page
- Logo – the image dimensions must 280 x 140 pixels
- Header background (if required – this is the navigation bar area with the menu options) – the dimensions must be 1900 x 140 pixels
- Wording content is required for this page

Compliance - Document Types
This section allows you to create categories for the documents that are added to your Compliance document library. You must have at least one option to categorise the documents, however, you can add as many categories as you feel would be useful – e.g. useful guidance, policies, etc.

Compliance - Document Library
Add any documents in this section that you would like to be included with the Compliance templates as download/upload files.

Click New Document and enter a document name and a title for candidates, then pick the Document Category from the drop down. Click Choose File to browse then upload your chosen document.
Please note the 1MB upload limit per document.Compliance Forms
Select New Form from the left-hand menu, enter a title and any instructions and press Save.
Any instructions added will be displayed to the candidate when they are completing the online form and when previewing/completing compliance forms from the client side.

- If you would like to capture a signature from the candidate when they are completing the onboarding form simply toggle Is Signature Allowed on.
- Once toggled on, another option will appear entitled Is Signature Mandatory, which allows you to determine whether it should be mandatory for the candidate to sign the form.

Press Save.
A second tab will be displayed – Questions. Click on this to build the form.
These forms are built in a similar way to the assessment forms functionality – you can create new questions, reorder your form and preview how it will look. Click New Question to create a new question in one of the following formats:

- Multi-Choice (One answer) - Presents a radio button against each option, however, the candidate is only able to choose one response.
- Multi-Choice (more than one answer) - Presents the options with a checkbox against each. The candidate can select as many answers as they wish.
- Order of Importance - Presents the options with an entry field against each option where the candidate can enter a numerical value to rank the selections.
- Free Text - A large, free text field
- Short Text - A smaller free text field
- Section-Header - Inserts a heading.
- Instructions - Inserts text instructions
- Date - A calendar dd/mm/yyyy field, with a calendar picker for the candidate to use.
Add the question wording under Question Text, choose whether the question should be mandatory, and then click Save.
Any multiple-choice questions require the options adding to the second Options tab. When you’re happy with the question content, click Save.

Compliance Templates
Compliance templates enable you to customise the specific documents, forms or content that will be associated with that compliance pack for a given type of offer.
Once you have added all the Compliance elements, you are ready to create the templates themselves.
The sections you created in Compliance settings will appear for you to select the relevant document or form for each section.
Select New Template from the left-hand menu, add a template name and click Save or copy from an existing template to create a new version.

Once a Compliance template has been issued to candidate(s) it is no longer editable and the ‘Save’ button will no longer appear.Item Types
Against each compliance section is an Item Type drop down:

|  |
If the candidate needs to download/upload the document, toggle on the Upload option next to that document. If the candidate needs to agree to the document, instead toggle on the Agree/Decline option.Contract / Letter
To allow a more flexible conditional offer process. You can issue a conditional offer letter/contract during compliance checks.
This allows a two-stage process: a conditional offer letter/contract issued with Compliance, followed by an unconditional/final offer letter and contract during onboarding.
Once you have selected the item type as ‘Contract / Letter’, the ‘Agree/Decline’ toggle will automatically be enabled as this requires a signature from the candidate.

If you do not require an electronic signature, you can toggle off ‘Agree/Decline’.

Candidates will then have the ability to download the letter as a document and has the ability to upload a copy in return (e.g. if you want the candidate to physically sign, scan and return the contract).
Candidate Label
For any documents set to be completed by the Compliance Admin, you can add a candidate-friendly label.

This is what is displayed to candidates in the What we're working on section of the actions page.

To Complete
This is where you determine who should complete the document – select either Compliance Admin or Candidate from the drop-down.

Please note: If the item type is Contract/Letter then this can only be completed by candidates. All other item types can be completed by both candidates and compliance admins.
Adding multiple items to a section
If you need to add multiple documents, select Multiple then in the Select Option column press Select.

A pop-up window will display; select the Item Type (either Document or Form), add the relevant document, and who should complete the document (of Compliance Admin, then include a candidate friendly label if required).

If you need to, you can add extra sections to the multiple option using the Add New Item button at the bottom of the tab.
Once you have added everything for this section, click Save. |  |
Teams
This section allows you to assign a list of users to a manager so they can review certain stats on the Onboarding they are managing. The stats can be seen on the Onboarding tab under Stats. |  |
Click New Team in the left-hand Menu – when the Team Setup window opens, enter a team name.

Select the Manager from the Team Manager Drop-down, then select all Team members from the Team Member drop-down (team members already selected will appear just under the selection drop down).

Once all users have been added, click Save.
FAQs
How do I add a contract to a compliance template?
When configuring your Compliance Template, use the Item Type field to select ‘Contract/Letter’ and connect a contract or letter using the dropdown in the ‘select option’ column.
Where do I create letters or contract?
Please see our Communications > Contracts guide
Are candidates notified when compliance is issued?
Yes, an automated email is triggered to the candidate inviting them to login and review the content that you have shared.
Can candidates upload images when completing their onboarding/compliance pack?
Yes, if an item is marked as ‘Upload’ in the onboarding/compliance template then candidates can upload both documents and images. The system will automatically compress images into appropriate dimensions/resolution.
Is there a limit to the number of letters/contracts I can issue?
Within a compliance or onboarding template, you can set as many items as you wish as ‘contract/letter’ item types. However both onboarding and compliance can only be issued once each (without over-writing the data received when previously issued).
How can I re-issue a contract / letter?
Navigate to the candidate record, within the job they have been offered. If your system configuration allows you to re-issue documents, you will have a ‘reset item’ button which will allow you to re-send the contract or letter.
Please note, when re-issuing, it is not possible to edit the content of the contract / letter, therefore this option should only be used if the templated content does not require manual adjustment.
Is there a way to track when a candidate views or downloads the contract?
The onboarding hub icons and compliance progress menu on the right hand side of the candidate record will update as the candidate accepts / uploads a document in return.
Is it possible to mark an onboarding/compliance item as complete if the gap/concern is still pending?
It is not possible to mark complete if there is a Gap & Concern pending. This will need to be approved first, once approved this will clear the Gap & Concern and allow you to proceed to mark the item as complete.
What happens if I mark an item as 'Not Applicable' when issuing onboarding or compliance?
Marking an item as 'Not Applicable' excludes it from the onboarding or compliance documents issued to the candidate and does not display the item in either Onboarding Hub or Onboarding Progress against the candidate record.
Can I release items marked as 'Not Applicable' at a later stage if needed?
Yes, you can choose to release items that were previously marked as 'Not Applicable' – only items from the original onboarding or compliance template are available to issue, however.
What if I mistakenly marked an item as 'Not Applicable'? How can I correct it?
You can reset the item and mark it as 'Applicable' using the 'Applicable/Not Applicable' toggle.
How do I configure the automated email to notify candidates of new items added to their onboarding or compliance process?
To set up this email, create a new email in 'Communications > Emails' and link it to the 'New Document Email' option in 'System Customization > Emails.'
What information is recorded in the candidate history when an item is marked as 'Not Applicable' or added as a new document?
The date, time, and the user responsible for these actions are recorded in the candidate history.
Do candidates see items marked as 'Not Applicable'?
No, candidates will not have visibility of items marked as 'Not Applicable' unless a system user later decides to add the document.
How are excluded items displayed in the Onboarding Hub and Onboarding Progress menu?
Excluded items appear greyed out against the candidate in the Onboarding Hub and are not displayed in the Onboarding Progress menu.
What happens when new documents are issued to candidates?
An automated email is sent to candidates to notify them of the new item, and the Onboarding Hub is updated to reflect the addition.
How does the 'Add/Remove Documents' feature affect candidate packs, document integrations, and reports?
Items marked as 'Not Applicable' will not be included in candidate packs, document integrations, or onboarding/compliance reports.
I need to add a document, but I don't see the 'Add Documents' button. What should I do?
To use the 'Add Documents' feature, you must first mark at least one item as 'Not Applicable' when originally initiating onboarding or compliance. If an entirely new form / document / letter is required, users should either use the reset item functionality and issue a new document, or start onboarding / compliance over again, and choose a template that features the item required.
Is there a way to indicate that an item is not required after it has been marked as complete?
If you realise an item is not required after marking it as complete, you can't change its status to 'Not Applicable.' You can, however, add a note against the item to explain what has happened.
How can I see which onboarding/compliance template was used to onboard the candidate?
To see which onboarding/compliance template was used to onboard the candidate you can view this information in the candidate’s history.
Simply click on the name of the user who started the onboarding/compliance process and a pop up will appear onscreen with this information.

Can I start the onboarding process multiple candidates at the same time?
Yes, you can start the onboarding process for up to 5 candidates at the same time.
Is it possible for a system user to upload a new compliance document, if a previous document has already been uploaded and marked as complete?
Yes, a system user can upload a new document within compliance even if a document has already been uploaded and marked as completed. Here’s what happens:
- A history entry is added to the candidate history with a date/time stamp indicating the new document upload.
- The icon in the Onboarding Hub changes to a green thumbs up.
- On the Compliance Progress page:
- "Marked Complete By" and "Marked Complete On" will no longer show the date/time and user information of the individual who previously indicated the document as complete.
- In the candidate history:
- The previous document upload history remains.
- The history entry for when the item was previously marked complete remains.
- The Mark Complete button becomes operational again.
- When the document is marked as complete again:
- The thumbs up icon in the onboarding hub changes to a green tick.
- The user's name and the date/time of completion are logged in both the Compliance tab and candidate history.
Do all onboarding documents get removed when a candidate's profile is deleted?
Yes, in compliance with GDPR regulations, all personally identifiable information is deleted from the system. This deletion occurs either in line with your archiving setup (configured in settings > system customisation) or when a candidate deletes their application/profile from the candidate site.
You can exclude candidates at specific statuses from archiving processes. For more details, please contact our support team for assistance.
Please note: If you choose to exclude candidates from archiving, the candidates’ terms and conditions should be updated to reflect this.
Can I specify the date format when using date merge fields in contracts?
You can customise the appearance of date merge fields in candidate contracts and offer letters. This feature enables you to choose a long format such as "Tuesday 26th March, 2024" for a more professional contract or letter appearance.
To specify the date format go to Settings > System Customisation > Set the date format and select the preferred date format for communications.

Please note that this also controls the date format display for when sending manual emails through the communication option in the candidate list action menu.
Was this article helpful?
That’s Great!
Thank you for your feedback
Sorry! We couldn't be helpful
Thank you for your feedback
Feedback sent
We appreciate your effort and will try to fix the article